How to Safely Remove a Drive on Windows 10
When you’re done using a USB drive on your Windows 10 machine, most people simply unplug it. But depending on the settings of your machine, it’s usually best to tell Windows before removing the drive to minimize any chance of data loss. Here’s how.
When Is It Safe to Just Unplug a USB Drive?
By default, you can often safely remove a USB drive from a Windows 10 machine by simply unplugging it—unless something is actively writing to it, and you don’t necessarily know when that’s happening in the background. It’s a good idea to safely remove drives if you’re concerned about data loss.
If you have enabled write caching on your USB drive (by selecting “Better Performance” in Device Manager), you will always need to use the “Safely Remove Hardware” notification icon to remove the drive safely.
RELATED: How to Quickly Find Specific System Settings on Windows 10
If you’d like to check if write caching is enabled on your removable drive, open the “Start” menu and type “Device Manager,” then hit “Enter.” Under the “Disk Drives” heading, locate the external drive, then right-click and select “Properties.” Under the “Policies” tab, look at the “Removal Policy” section.
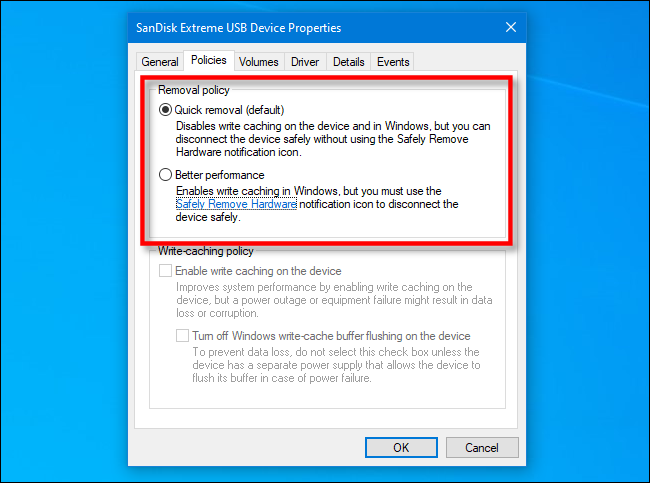
If “Quick Removal” is selected, then it’s safe to simply unplug your drive (when it’s not in use) without telling Windows.
If you have “Better Performance” selected, you’ll definitely need to use the “Safely Remove Hardware” notification icon to remove the drive safely. Here’s how.
How to Safely Remove a USB Drive on Windows 10
If you have a USB drive plugged into your Windows 10 machine and you’d like to safely eject, locate the “Safely Remove Hardware” icon (which looks like a USB plug) in your taskbar notifications area, which is usually in the lower-right corner of your screen. If you can’t see it, click the carat-shaped up arrow to see hidden icons.

Once the “Safely Remove Hardware” icon has been revealed, right-click it.
![]()
In the menu that pops up, locate the name of the drive you’d like to remove; It will have the word “Eject” in front of it. Click it.

If there are any write operations in progress, Windows will make sure that everything is complete before ejecting the drive. Once the drive is safe to remove, Windows will alert you with a notification pop-up titled “Safe To Remove Hardware.”

It is now safe to unplug the drive from your PC.


Leave a reply