
How to Use a Digital Camera as a Webcam
Good webcams can be hard to find. Fortunately, you can use many digital cameras as makeshift webcams. If you have a high-end mirrorless or DSLR camera, you’ll even get a big boost in video quality for your online meetings.
Using Your Camera as a Webcam
The ability to use your camera as a webcam is largely dependent on which camera you own. Some compact point-and-shoot cameras are bundled with first-party software and drivers that allow you to use them as webcams.
Unfortunately, this seems to be a less common feature nowadays. However, third-party software has sprung up that allows you to use many Nikon and Canon cameras for this purpose. As you might have guessed, though, this software isn’t free.
Modern mirrorless and DSLR cameras that produce clean HDMI output (meaning, no overlays on the screen), will give you the best results. You’ll need additional hardware to do this, but it should work with any future camera upgrades, too.
Accessories You’ll Need
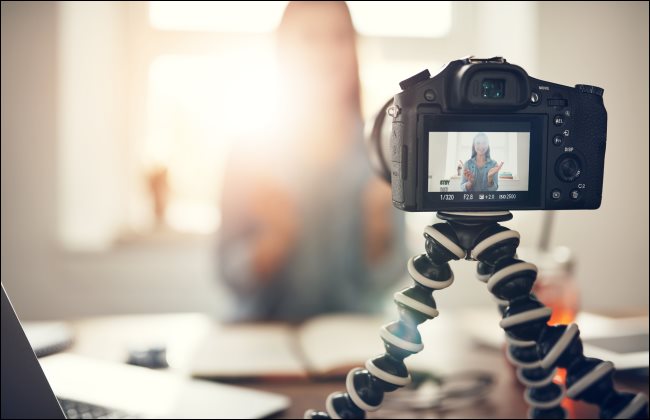
If you’re going to be using a camera as a webcam, you’ll need something to mount it on like, a tripod. You’ll also need some way of powering the camera, assuming power-over-USB isn’t an option. For many mirrorless and DSLR cameras, that means buying a “dummy battery.” Dummy batteries sit in the battery compartment but plug in to the wall.
All these methods require either a micro-USB-to-USB cable (like the one that came with your camera), or a mini HDMI-/HDMI-to-HDMI cable. For our last (and most effective) solution, you’ll need a capture device, as well.
Method 1: Use Your Camera’s Software
The first thing to do is check whether your camera supports this feature natively through the manufacturer’s software or drivers. The best way to do this is to look at the manual and any bundled software. You might also find software downloads for your particular model on your camera manufacturer’s website.
A cursory search of the internet for your camera model and webcam (for example, “GoPro hero 3 webcam”) should tell you what you need to know. If tutorials start recommending capture cards and HDMI adapters, it’s unlikely your camera can be used as a webcam over plain old USB.
Update: Canon now offers an “EOS Webcam Utility” that allows “select EOS Interchangeable Lens Cameras (ILC) and PowerShot cameras” to function as webcams on 64-bit Windows 10 systems.
Once you’ve downloaded and installed any drivers, your camera should be recognized as a capture device by your Windows or Mac computer. You can then choose it as an input device in whichever applications you want to use, including Zoom, Google Meet, Microsoft Teams, Slack, Skype, Discord, or FaceTime.
If your camera doesn’t have webcam mode support, don’t fret. Some action cameras and compact point-and-shoots support this feature, but most mirrorless and DSLRs do not. You have other options.
Method 2: Use a Third-Party App
If your camera is supported, you can use a third-party application to turn your DSLR, prosumer, or compact camera into a webcam. The Windows-only Sparkocam works with a large variety of Canon cameras and a small number of Nikon cameras, too.
Unfortunately, Sparkocam has its problems. One Redditor noted “it’s bulky and full of bloatware.” Another remarked that he or she “cannot remove the demo of sparko cam (sic)” from the computer. Another shared that he or she “tried using eos and Sparkocam but I am unhappy with how laggy the video is.”
Based on our research, there aren’t presently any alternatives to Sparkocam, and it’s pricey. There are separate versions for Canon and Nikon, one that supports both, and another that focuses on the app’s other features, like green-screen and filters. A single-user license for your system of choice is $50 ($70 if you want to use both Nikon and Canon systems).
It’s hard to recommend Sparkocam, but, for some people, there might not be an alternative. So, if you find yourself in this boat, you use Windows, and you don’t have any other alternatives, Sparkocam is your best bet. Before you buy the app, though, you might want to read on and consider the HDMI route.
Method 3: Use an HDMI-to-USB Adapter
For a serious setup, you can’t beat HDMI capture. This technique takes a raw, uncompressed video feed from your mirrorless or DSLR camera and turns it into a USB webcam feed. The quality is unbeatable, but you’ll need a few extra bits of equipment to make it work.
You’ll first want to make sure your camera is compatible with your chosen capture device. Many cameras offer a clean HDMI output for use with external recorders, which means there’s no overlay or camera settings visible onscreen.
If your camera has an HDMI out (or mini-HDMI out) port, you’re halfway there. To test this, connect your camera to a regular TV or monitor and try to find a “clean” output mode. If you’re still unsure, search the web for your model and see what others have found.
To capture video, you’ll need a capture device that converts an HDMI input to USB. The best-known of these devices is the Elgato Cam Link 4K. This small dongle works with Mac and Windows computers and retails for around $130. Once connected, your camera will appear as a capture device, and you can use it as a webcam in your favorite apps.
Before you buy, make sure to check that your camera is on Elgato’s list of supported cameras. You can also search the web for your make and model to see if others have had success. The Cam Link 4K supports up to 4K resolution, or 1080p at 60 frames per second. You can use almost any HDMI capture device for this, but the Cam Link 4K is purpose-built (and cheaper).
Elgato isn’t the only company producing HDMI-to-USB capture devices. You can find all sorts of cheap knockoffs on Amazon (like this one); just search “HDMI to USB video capture” or something similar. Unfortunately, these cheaper devices lack the support and polish you get from a company like Elgato. They might be unreliable and have poor driver support, so make sure you read the reviews before parting with your cash.
If you can afford the hardware, you’ll get the best results from an HDMI capture setup. Since you’re using a mirrorless or digital SLR, you also have the freedom to choose a flattering lens.
Don’t Forget a Microphone
In-camera microphones are only marginally better than not having any sound at all. They’re tinny, poorly positioned, too quiet, and often capture additional sound from the lens focusing mechanism. Do yourself a favor and get a microphone for your desk.
If that’s too much, use a pair of head- or earphones with a microphone attached. A bad microphone that’s close to your face will sound better than the one mounted above your monitor. Some computers, like Macs, come with passable microphones, which might also work. Other computers, however, include pretty bad built-in mics with poor sound quality.
For best results, invest in an XLR microphone. Alternatively, a USB microphone will do the job nicely, too.


Leave a reply